Monday, April 30, 2012

Football penguin

Yayyyy, I got some finishing done this weekend! It's a good job you can't see me doing my happy dance as I have two left feet, but I was happy!

You may remember this cute little fella....


He belongs to set of football penguins (or soccer, depending on where you're from!)

I charted nine penguins wearing different football team shirts....or as close as possible, since the shirts are all trademarked/licenced. I picked the most popular teams, ( ok, my son told me which ones to do as I have absolutely no interest in football!) so, in alphabetical order we have  AC Milan, Arsenal, Aston Villa, Barcelona, Celtic, Chelsea, Liverpool, Man Utd and Rangers. Believe me, this may not excite you, but it will have the guys in your life jumping up and down! And isn't it nice to have something to stitch that you know they're going to love?!!!

So, using this little fella who happens to be wearing the Aston Villa colours, I made this card...


I love this card! The style of card is called an easel card and I love the fact that it would look really different from all the other cards standing on your mantelpiece! I also love that the recipient can just remove the stitching and all the matting and just pop the whole thing into a frame. Here are some close ups of how it's made...

A regular card, but with one extra fold!
A couple of split pins keep the front upright!

It folds flat for posting!

These penguins were designed with Father's Day in mind, but could also be used for birthdays, get well etc.


I also managed to use the chefs from my last post and made some cute items, but I'm saving them for my next post, as I still have one more thing to make with them!

Until next time...happy stitching!

Rhona

Thursday, April 26, 2012

Finishes and finishing!

As the title would suggest, I have some finishes to show you. Woohoo!


I've been beavering away at some designs suitable for Father's Day, which in case you hadn't realized, is June 17th.  Not long if you want to stitch something without having to panic about getting it finished! (Always my problem!!!)

Knowing how the men in our life love to be the King of The Grill, I've designed an alphabet with some cute chefs. I thought they would make great additions to aprons, oven gloves etc, for your 'top chef' to have when grilling season starts.

Here are some close ups....


I'm also going to be releasing some matching card designs. The one that I have stitched up matches the whole barbeque theme that I think would be perfect for Father's Day. The wording reads 'We're having a barbeque', but there will be an alphabet included so you can change it to read 'The Norries are having a barbeque' or 'Dave and Sue are having a barbeque' etc. I love how you can add a personal touch like that in your cross stitching. Just think how you're guests would feel getting an invitation like that!


The other card designs have titles such as "Drinks at our house', 'Pizza night', 'Let's get together' so they are suitable for a whole host get-togethers. There are eight designs in this set. I'm releasing these in time for Father's Day but really they are suitable for so many occasions.

And of course, Mother's day here in the US is May 13th and these designs would be perfect for mums too. Oooh, you could even do a matching set....his n hers! How cute!

So as far as finishing these designs, well, (hangs her head in shame) all I've got are ideas at the moment! I was thinking of oven gloves and aprons for Father's Day gifts. Using the designs for females is so much easier (as always!). The little chefs would make a great cover for a recipe folder. None of the males in my household would follow a recipe, so that's why I'm thinking of this for a female gift, but it would work for a male too!

Any more suggestions on how to finish these designs off would be much appreciated! I love to hear your ideas.


Until next time...happy stitching!

Rhona


Sunday, April 22, 2012

Jar topper

Thanks to everyone for all the lovely comments about my ort jar. I've had quite a few people asking how I made it, and requesting a tutorial, so here goes!


It's really quite simple, although a bit fiddly. So, the most obvious thing you need is the jar! I'm not sure what the correct name is for this type of jar, but they are often called mason jars, canning jars, kilner jars or preserving jars. They have a two part lid and come in various sizes. The one I used is about 9cm high and the top is about 8cm wide.

Other supplies needed are -

stitched piece
stuffing or wadding
scissors,
glue
tape
paper


Step 1

Separate the lid pieces. Using the flat disc part, layer LOTS of stuffing or batting. I used batting as that was all I had. I cut a couple of circles the same size as the lid and then some scrap pieces to make up the height. You need quite a lot as you can see from this picture...


It looks like it there would be too much there but it flattens down quite a bit. Remember you can play around with the amount until you get it to where you're happy with it.

Step 2

Lay the stitched piece over the mountain of stuffing and centralize. This was the fiddly bit - especially since the design I used was circular, it was really obvious if it was off center - and these things bug me no end! Trim the fabric so it's approx 2 - 3cm wider than the jar lid.


Step 3

Once you have the design in place, make sure the aida is smooth and without any puckers, lumps or bumps! Fold and trim fabric to remove excess bulk. Glue or tape in place as pictured below.  This picture was my 'trial run', but failed miserably! My plan was to use some thick cardboard then hide the folds with the metal disc part of the lid, of course there was too much bulk and the lid wouldn't screw on to the jar!  :(


So, ignore the fact that it's cardboard in the picture and glue or tape straight to the metal lid.  I forgot to take a picture of this part when I used the metal lid so that's why I'm using this picture (and having to confess my failures! lol)

Step 4  

Taking a glue gun, carefully place a layer of glue round the inside of the jar ring. Don't use too much as you don't want it oozing out onto your stitching! Place the two parts of the lid together, pressing together firmly.


Step 5

Cut out a circle of paper to hide the inside of the lid. Glue in place. You could use fancy patterned paper or you could print off a stitchy saying or a favourite quote to add a little bit of personality to your jar.


So, that's how I made my jar. Hope that all makes sense. If you have any questions you can always email me and I'll certainly try to help.

If you can't find this type of jar, never fear, you can still make something very similar! Just cut out a circle (slightly smaller than your jar lid) of very thick card. Follow steps 1, 2 and 3 using the card instead of the metal disc. Then glue to the top of the jar lid. Glue some cord in a co-ordinating colour to hide the join.

I'm going to make some more of these jars for (dare I say it?!!) Christmas presents. I have a friend who is a quilter, so I'm going to pop in some scissors, needles, pins, quilting wax etc. Wouldn't that make a fantastic gift?  I'm going to be stocking up on these jars as there are so many different things to do with them for gifts...I love it!

Until next time...happy stitching!

Rhona

Saturday, April 21, 2012

TUSAL

I can't believe it's TUSAL time again! Thank heavens that I popped on to post the tutorial for the ort jar, otherwise I would have completely forgotten all about the new moon.

Here's my orts jar for this month...


Also in the jar are the thread labels  that I pop in there when I finish a skein. I then put the labels into my purse so that the next time I'm in the craft store I know exactly which colours I need to buy. Since there are a few labels in there, I think I might have a little trip to Joann's for some thread (nothing else!!!)

I'll post the tutorial for the ort jar topper tomorrow.

Until next time...happy stitching!

Rhona

Monday, April 16, 2012

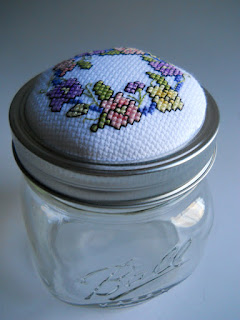
Pretty and practical.

That's what my new finish is - pretty and practical!

This is what I made using the stitching I showed in my last post...


And this is how it's practical - it's my new ort jar and needle keeper all in one!!


I really love this idea, it's so simple to make. I've decided I'm going to make another couple of them and give them to two of my very dear friends who are thinking of attempting their first cross stitch.(It's taken me a long time to persuade them!!!) I'm going to make them each a jar, slightly bigger than this one, and fill it with some cross stitch supplies - scissors, needles etc and one of the free kits you get with the magazines....cross stitch in a jar!

And it's been so long since I showed you any of my Geisha progress, although really, there hasn't been much progress (hangs head in shame) I thought I should post some pictures, if nothing else, it might motivate me to get more done on her!

This is where I was with her last time I showed you....


And this is where I am now...


Not much stitching considering it's been almost a month between pictures! Hopefully there will be more progress in the next month!

Until next time...happy stitching!

Rhona

Thursday, April 12, 2012

Dreaming of summer


After the strawberries of the jam pot and the 'secret' stitching of Monday (remember all that yellow? )  my mind has been well and truly thinking of summer. I'm looking forward to all the lovely flowers of summer with their bright colours and butterfly visitors. And since the daffodils are only just beginning to bloom here, the only way I could get my summertime flower fix was to stitch some flowers! Here's what I did on Tuesday evening....


It's actually stitched on white aida, although the morning light makes it look quite blue!

And this is how it looks after spending last evening back stitching....


I have a cute and practical idea for finishing off these little sweet peas. I'm hoping to start the project tonight, although I really ought to try and fit in a Zumba class ( I spend way too much time sitting on my butt!!!)  Mmmm, what to do - Zumba or stitching? It's a tough choice! I'll let you know which one wins ;)

And to prove that I don't just dream of summer flowers, (well I'm dreaming of a nice flower filled patio) here's my attempts at making that dream come true.....


Morning glory seeds planted and lovingly talked to every morning in the hope that they will grow! And just a quick disclaimer, I'm not being paid by a certain Greek yogurt manufacturer to advertise their product (although it is delicious), it's just that I'm too cheap to go and buy plastic plant pots!

One more thing before I go - can I ask you to click on the Breast Cancer button up there at the top right hand side of this page? It takes less than a minute to do, but could help save a life - how awesome is that!

Until next time....happy stitching!

Rhona

Monday, April 9, 2012

Busy, busy, busy!

As you can tell by my post title, I have been rather busy! Sadly, I can't show you what I have been stitching....not yet anyway! It does involve an awful lot of this colour.....


It also involved a mad panic as I realized I was running out of DMC 744, and guess which colour the craft stores had none of? Yup, you guessed it - 744!

And don't panic, it's not TUSAL time, it's just that I can't show you what I have been working on until it's published, so this is the only picture I can post at the moment!!!

Anyway, this last project has been so time consuming that I haven't managed to visit any blogs lately, so I apologise for that, but I am hoping to remedy that this week!

Thanks for stopping by.

Until next time (when I should have something interesting to show you!)....happy stitching!

Rhona